Installation
Follow this procedure only if you upgrade from Xorux Virtual Appliance v7.00-2 and older.
Virtual Appliance v7.01+ has all necessary already in place.
CentOS 7 std repositories does not contain such new version
Download and install these packages sqlite-3.26.0-3.el7.x86_64.rpm, sqlite-libs-3.26.0-3.el7.x86_64.rpm
You can even download perl-DBD-SQLite-with_dependencies.x86_64.tgz
Note: it might take up to 1 hour since enabling XORMON=1 till XorMon front-end can succesfully connect to the back-end (backend creates all necessary databases within an hour)
Note: do not miss the last "/" in the URL when using a proxy
XorMon actually supports access only over the HTTPS protocol.
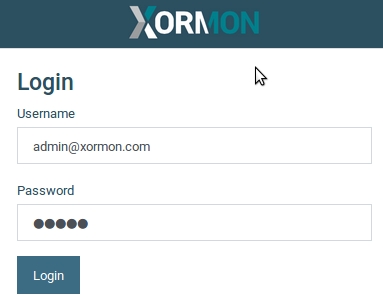
The default login credentials are username: admin@xormon.com, password: xorux4you
After save you will see if that connection is successfull or failed.
Check error message and correct problems.
If you have no clue then contact us via support@xorux.com.
Virtual Appliance v7.01+ has all necessary already in place.
All installation steps do either under root user or use sudo
/opt/xorux/xormon/config/application.properties can be modified to change webapp defaults (e.g. server.port=8443, server.ssl.key-store=selfsigned).
In case there is only /opt/xorux/xormon/config/application.properties-template then copy it to /opt/xorux/xormon/config/application.properties
When it runs then it creates its own database and application logs in home directory of the user: /home/lpar2rrd/xormon-data
Java
-
Install Java runtime environment version >= 8 from repository or by direct download.
It might be already in place, verify it.
java -version
  openjdk version "1.8.0_101"
Upgrade/install if does not:
yum install java-1.8.0
XorMon Installation
-
Adjust version number if necessary.
rpm -Uvh ./xormon-1.0.0-1.noarch.rpmIt will be installed into /opt/xorux/xormon dicretory
/opt/xorux/xormon/config/application.properties can be modified to change webapp defaults (e.g. server.port=8443, server.ssl.key-store=selfsigned).
In case there is only /opt/xorux/xormon/config/application.properties-template then copy it to /opt/xorux/xormon/config/application.properties
When it runs then it creates its own database and application logs in home directory of the user: /home/lpar2rrd/xormon-data
Service (systemd)
-
Service must be configured to start XorMon on system start.
XorMon uses embedded Tomcat.
Create systemd.service file: /etc/systemd/system/xormon.service
vi /etc/systemd/system/xormon.service
[Unit]
Description=XorMon webapp
After=network.target

[Service]
Type=exec

User=lpar2rrd

WorkingDirectory=/home/xormon
ExecStart=/usr/bin/java -Xms512M -Xmx1024M -server -XX:+UseG1GC -Dh2.bindAddress=127.0.0.1 -jar /opt/xorux/xormon/xormon.war
SuccessExitStatus=143
[Install]
WantedBy=multi-user.target
Start service:
systemctl daemon-reload
systemctl enable xormon
systemctl start xormon
Check service status:
systemctl status xormon
Optional: enable UI to run on port 443 instead of default 8443
-
Configure proxy in Apache under root.
vi /etc/httpd/conf.d/ssl.confand put below code right behind this line: "<VirtualHost _default_:443>"
RewriteEngine On
RewriteCond %{HTTP:Upgrade} =websocket [NC]
RewriteRule ^/xormon/ws(.*)    wss://127.0.0.1:8443/ws$1 [P,L]

ProxyPass /xormon/ https://127.0.0.1:8443/
<location /xormon/>
ProxyPassReverse /
</location>

ProxyPreserveHost On
SSLProxyEngine On

# skip self-signed cert verification
SSLProxyVerify none
SSLProxyCheckPeerCN off
SSLProxyCheckPeerName off
SSLProxyCheckPeerExpire off
Restart Apache
systemctl restart httpd.service
LPAR2RRD/STOR2RRD
-
Upgrade to the latest LPAR2RRD and STOR2RRD, get them from download page. Use always the latest version.
SQLite
-
There must be installed SQlite 3.8+
Check actual SQLite version
sqlite3 -version
  3.26.0 2018-12-01 12:34:55 bf8c1b2b7a5960c282e543b9c293686dccff272512d08865f4600fb58238alt1
Install/upgrade SQLite to 3.26 if actual version is less than 3.8
CentOS 7 std repositories does not contain such new version
Download and install these packages sqlite-3.26.0-3.el7.x86_64.rpm, sqlite-libs-3.26.0-3.el7.x86_64.rpm
You can even download perl-DBD-SQLite-with_dependencies.x86_64.tgz
yum install perl-DBD-SQLite
yum install sqlite-3.26.0-3.el7.x86_64.rpm
yum install sqlite-libs-3.26.0-3.el7.x86_64.rpm
Make sure all is installed:
cd /home/lpar2rrd/lpar2rrd
./bin/SQLiteDB-test.sh
  OK
Enable XorMon connection on LPAR2RRD/STOR2RRD
-
Edit /home/lpar2rrd/lpar2rrd/etc/.magic and enable XorMon application connection.
Options:
umask 022
cd /home/lpar2rrd/lpar2rrd/    # or where is your LPAR2RRD home
vi etc/.magic
export XORMON=1Do same for STOR2RRD: /home/stor2rrd/stor2rrd/etc/.magic
Note: it might take up to 1 hour since enabling XORMON=1 till XorMon front-end can succesfully connect to the back-end (backend creates all necessary databases within an hour)
LPAR2RRD: restart the daemon
-
Restart LPAR2RRD daemon to apply XorMon setting under lpar2rrd user account:
cd /home/lpar2rrd/lpar2rrd
./load.sh daemon_stop
./load.sh daemon_start
Application access
XorMon is available at https://<server>:8443/, (if you have enabled Apache proxy then https://<server>/xormon/)Note: do not miss the last "/" in the URL when using a proxy
XorMon actually supports access only over the HTTPS protocol.
The default login credentials are username: admin@xormon.com, password: xorux4you
 |
LPARRRD/STOR2RRD back-end conenction
Navigate: UI ➡ Top-right ➡ Settings ➡ Other ➡ Backend and configure path to local STOR2RRD/LPAR2RRD installation or remote HTTPS server.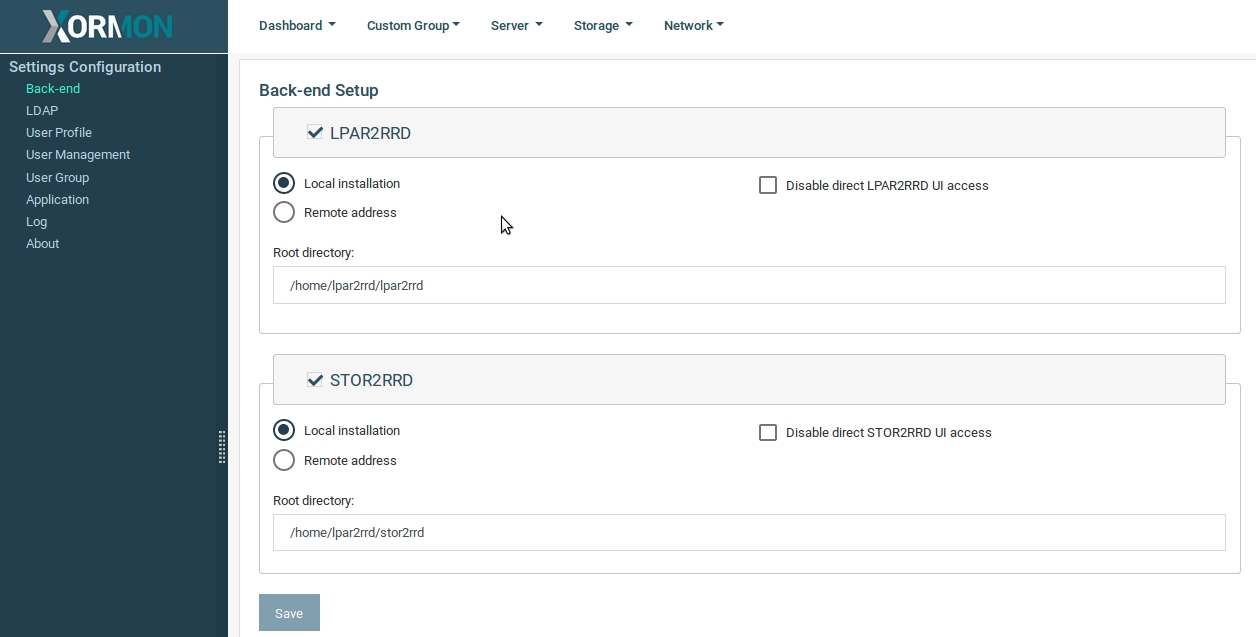 |
After save you will see if that connection is successfull or failed.
Check error message and correct problems.
If you have no clue then contact us via support@xorux.com.