What's new
We are building a new generation of our infrastructure monitoring tool.It will bring a new level of infrastructure monitoring by relying on a modern technology stack.
In particular reporting, exporting, alerting and presentation capabilities are far ahead of our current tools.
Beta version testing is already available, get the package from the download page.
It will go live in April 2024.
Our goals
- Better user experience with interactive graphs and more customizable interface
- Enhanced alerting, reporting and exporting
- Better integration of all monitored platforms with end-to-end visibility
- Modern, scalable and future-proof backend
- Integration with customer's IT processes using REST APIs
Features
- Interactive graphs - filter, sort, zoom, select individual items
- APIs for better integration with other tools - configuration, data export
- Alerting and exporting available for all devices, technologies and all their metrics
- Structured Custom Groups and Dashboards
- Improved reporting and data exporting
- Highly intuitive forms using previews, filters and regular expressions
- Mapping between virtualization platforms and storage systems - VM to Volume
- Microservice architecture
- Ready for containerized deployment
Technologies
- Frontend: JavaScript, React, Plotly.js
- Backend: Typescript, Node.JS, Nest.JS, Python, Perl, Unix shell
- Database: TimescaleDB
- Microservice architecture
Current state
You can check the current state of XorMon NG on our demo website.(It is an early preview version and some functionality is still missing.)
demo-ng.xormon.com
Do you want to help us shape the future of XorMon NG?
We would be happy to involve you in the process and hear your feedback.Let us know if you are interested: support@xorux.com
Some examples what to expect from XorMon NG
| The overall look and feel remains the same |
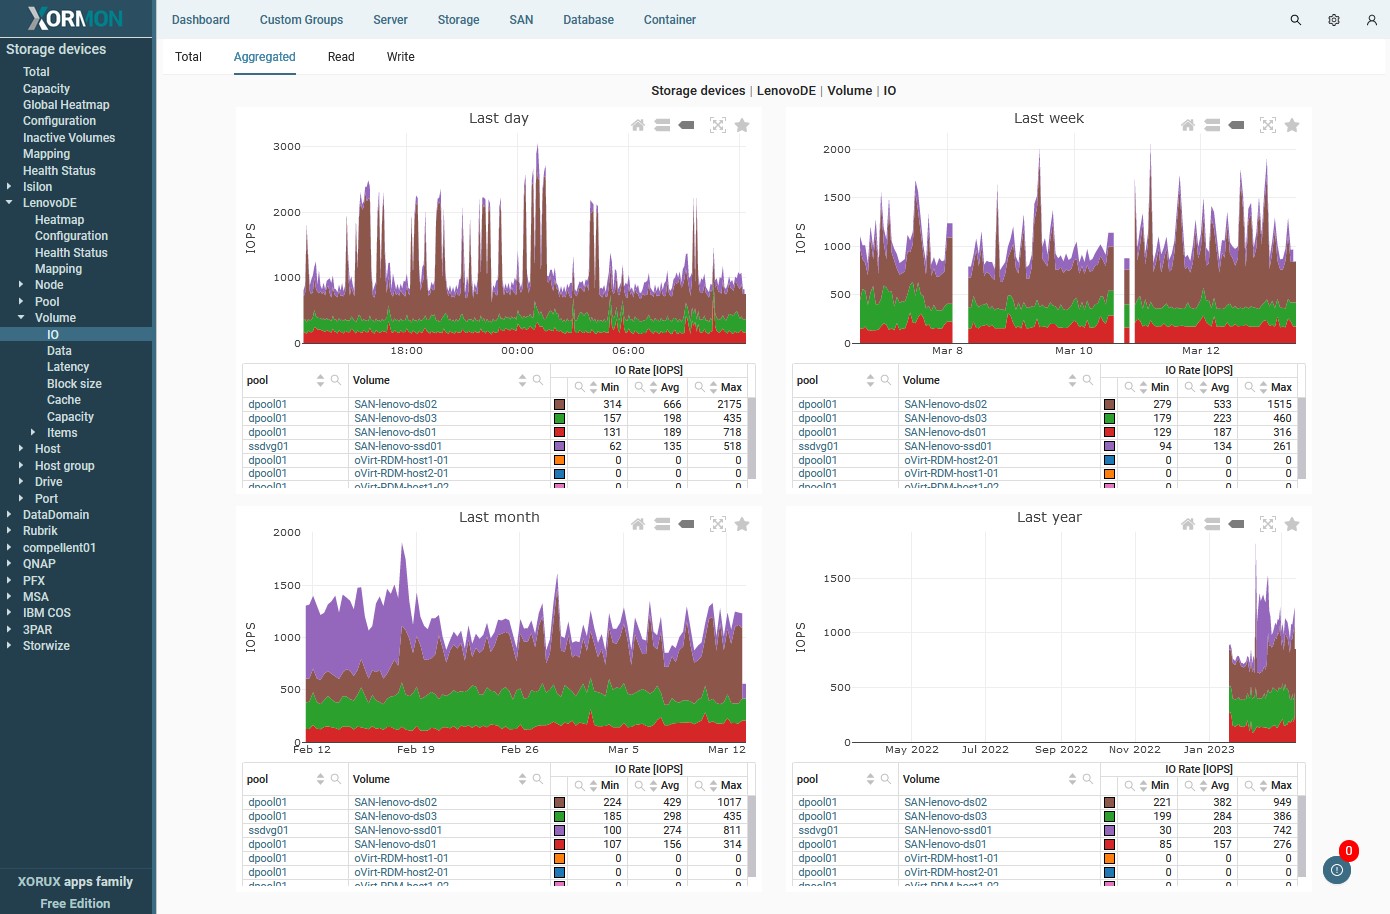 |
| Interactive graphs You can select and view only the items you need, zoom and pan the timeline, search and filter. |
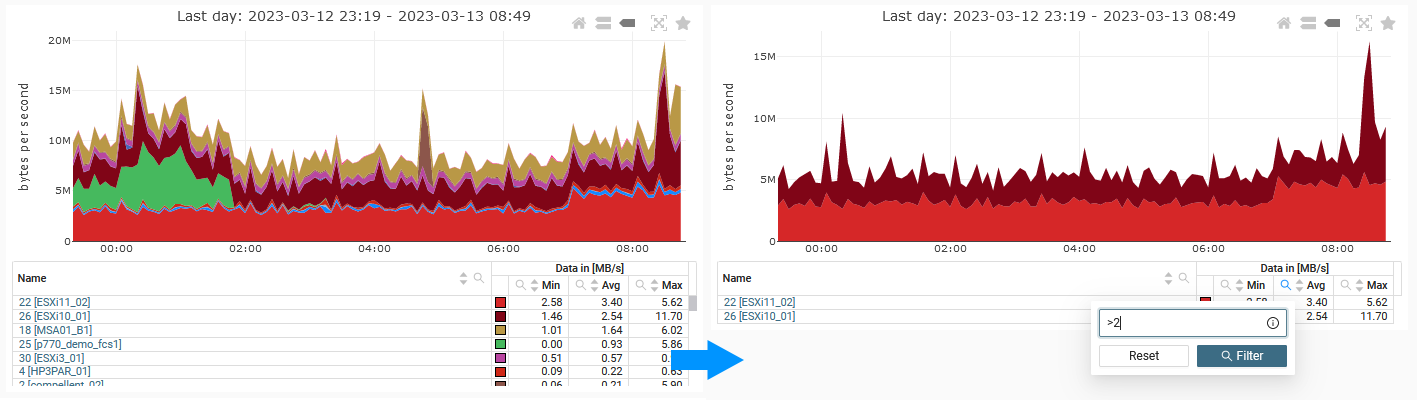 |
 |
| Better organization of items Custom groups and dashboards support all technologies and allow you to create multi-level folders to easily organize and navigate in complex environments. |
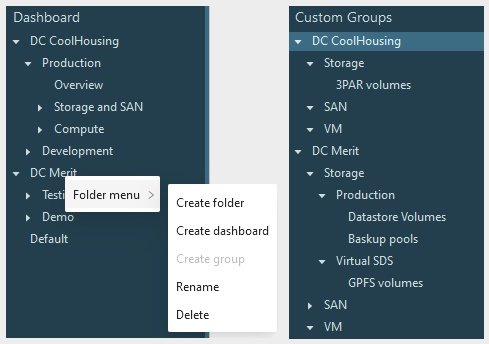 |
| Pinning a graph to a dashboard is more intuitive. It will also allow you to pin a single graph to multiple dashboards. |
 |
| Improved alerting Alerting is supported for all technologies. It is possible to create an alert definition for multiple items. |
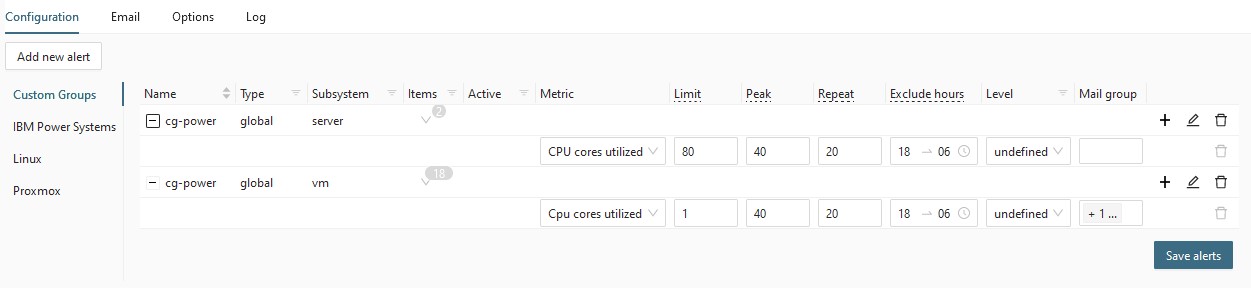 |
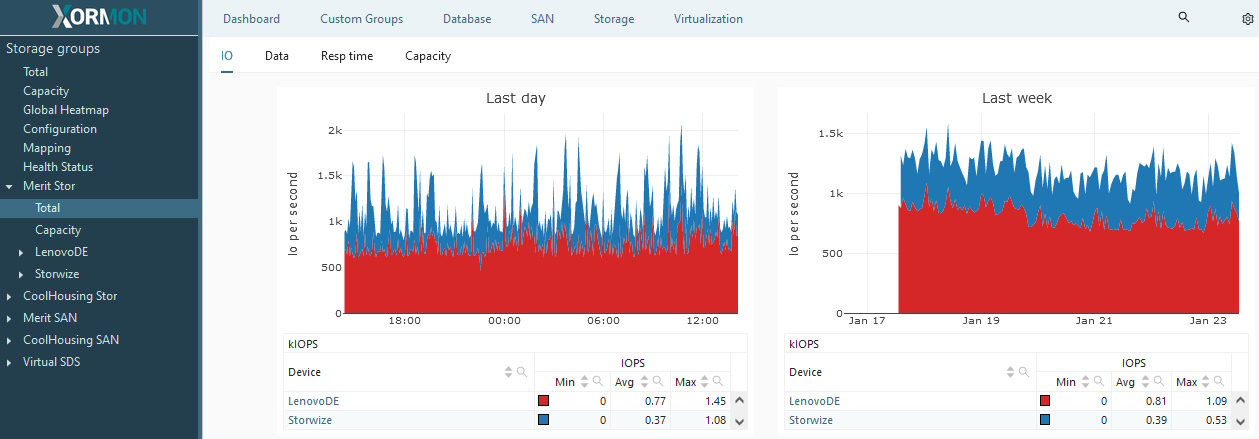
| Storage group totals Storage groups now show aggregated metrics for all devices in the group. |
 |
| Exporter API The Exporter API allows exporting data in JSON, CSV and XLSX formats. |
 |
| SAN Topology Improved SAN topology visualisation. |
 |
Navigation
The user interface contains 5 navigation areas:- (top) global menu bar provides access to features and configured technologies
- (top-right) configuration menu (hamburger-like menu)
- (left) local menu tree
- (top) local tabs menu
- (bottom right) notification area
Dashboard
Dashboard shows selected graphs in one place.How to add a graph to dashboard
- In any graph's top-right corner click the [star] icon Manage in dashboards.
- In the new modal window, click + to add a dashboard. Any graph can be in multiple dashboards.
- Select a dashboard from the drop-down list. Dashboards can be organized in folders. Use context menu (secondary click) to create, rename and delete folders.
- Changes are saved instantly. If you want to remove the graph from a dashboard, use the [X] Remove from this dashboard icon and confirm you choice.
Custom groups
Custom groups show aggregated data for selected items across a subsystem. The feature can be used to keep a filtered selection of items or aggregate data from one subsystem across multiple devices.- How to create a new custom group
- Go to page [cog] ➡ Custom groups.
- Select tab for the desired technology class: Server, Storage, SAN or LAN
- Click + New in the table heading.
- Define the custom group. Mandatory fields are highlighted red when empty. The new Custom group is saved, only when you click the [save custom group] icon. If you leave the Custom groups page, unsaved changes will be lost. Creating a new custom group can be cancelled by clicking the [delete custom group] icon.
- Enter the new custom group's Name.
- If creating a new Server [Virtualization] custom group, select Type, the technology for this Custom group.
- Select Subsystem of this custom group.
- optional: Select menu a custom Folder.
- optional: If you want to filter items by their label, entry the label in the Select items field. This option supports regular expressions; enable them by checking Regex. Then, you can use multiple rules, click Add rule to add each new rule. Preview a selection of items using the [Preview] icon for all rules combined or on the right of each rule for that rule. To remove a rule click the Remove rule on the right.
- How to delete a custom group
- Go to page [cog] ➡ Custom groups.
- Select tab for the desired technology class: Server, Storage, SAN or LAN
- Find the custom group in the table. The table can be sorted or filtered using the icons on the right of each main column in the heading.
- Click the [delete custom group] icon in the custom group's row on the right.
- regexp syntax: JavaScript uses Perl syntax, but regexps are passed to SQL queries, hence probably POSIX Regular Expressions
Alerting
How to add a new alert- Alert group
- Go to page [cog] ➡ Alerting.
- Click Add new alert.
- In the modal window:
- Type Personal / Global: If you select Personal, you will get alerts from this group only to your e-mail address from your XorMon user account. Global allows you to select custom mail groups for each alert.
- Select whether the alert group should be for server platforms, storages, or custom groups (TODO reconsider label HW Group)
- Select the specific technology and Subsystem, or Custom group.
- Enter the new alert group's name. (TODO move this field to the top/bottom)
- If the alert is for servers or storages, select items either by name from the list, or using a regular expression.
- E-mail group
- Go to page [cog] ➡ Alerting, select tab Email.
- Create a new e-mail group:
- Click New Email Group button.
- Enter the e-mail group's name.
- Enter an e-mail address in the Email field. Add more e-mail addresses by clicking the + Email button. Remove an address or an empty field by clicking the [bin] icon on the right.
- Click Save.
- Alert
- Click an alert group in the table to unfold its list of alerts.
- Click + icon (Add alert to this group) on the right.
- In the new table row, specify the new alert:
- Select the metric.
- Enter the limit (threshold value) that will trigger the alert.
- optional: Peak
- optional: Repeat
- optional: Exclude hours
- Select Level: when you get notified, how the alert will be labeled.
- If the Alert group is Type: Global, you can select e-mail groups that will be notified.
Storage groups
...
There are several ways to install and try our new XorMon NG
XoMon NG, comes pre-installed on the Xorux Virtual Appliance XorMon NG (XoruX-XorMon-NG-<ver>-OVF.zip).
Note: this is a different Virtual Appliance than we use for our other tools (LPAR2RRD/STOR2RRD).
Sizing, start with this setup (for monitoring up to 5000 VMs and 20 storage devices):
- 1) VMware OVF appliance with pre-installed XorMon NG
- 2) Running XorMon NG in a Docker container
- 3) Manual installation on a clean Linux OS
1) VMware OVA with pre-installed instance
This is the recommended option.XoMon NG, comes pre-installed on the Xorux Virtual Appliance XorMon NG (XoruX-XorMon-NG-<ver>-OVF.zip).
Note: this is a different Virtual Appliance than we use for our other tools (LPAR2RRD/STOR2RRD).
- Sizing: start with this setup (for monitoring up to 5000 VMs and 20 storage devices):
- 6 vCPUs
- 24GB RAM
- 200GB disk space
- Deploy Virtual Appliance XoruX-XorMon-NG-<ver>-OVF.zip
Download XorMon NG and follow attached pdf docu in the downloaded zip package to deploy it
- Log in to the XorMon NG UI: https://<machine hostname or IP>/
- Upgrade to the latest available XorMon NG version (if the appliance does not contain it)
Ugrade docu
2) Running XorMon NG in a Docker container
Running XorMon NG is a quick and simple way to test the new version. However, we do not currently recommend using Docker version of XorMon NG for long-term production use.
Important notice:
Some devices require installation of third-party tools,
which is currently not supported in the Docker version.
This restriction applies to: All Databases, AWS, Google Cloud and some Storage systems.
You can see which storage systems require additional software: https://stor2rrd.com/install.php#storages
VMware, on the other hand, is supported and VMware Perl SDK can be installed using XorMon NG GUI.
There are two options:- Docker compose method
- Docker run method
- 6 vCPUs
- 24GB RAM
- 200GB disk space
Docker compose method
- Prerequisites
- Linux VM with the latest version of Docker Engine
- access to Docker Hub
- available ports: 5432 and 8443
- Docker compose CLI plugin
- Create .env file
cd ~/xormon-ng
vi .env
File contentsAPP_PORT=8443 APP_TIMEZONE=<timezone> DB_HOST=timescaledb DB_PORT=5432 DB_USERNAME=postgres DB_PASSWORD=<db_password> DB_DATABASE=xormon APP_DEBUG=false APP_SECRET=<xormon-secret>
Replace <variables> with values:- <timezone> : Linux timezone, e.g. 'Europe/Prague' (see TZ in /usr/share/zoneinfo)
- <db_password> : password used for running Timescale DB container
- <xormon-secret> : any unique string, e.g. 'my-xormon-secret'
- Create docker-compose YAML file
cd ~/xormon-ng
vi docker-compose.yml
file contents (copy/paste)services: timescaledb: image: timescale/timescaledb:latest-pg16 restart: unless-stopped environment: - POSTGRES_USER=${DB_USERNAME} - POSTGRES_PASSWORD=${DB_PASSWORD} volumes: - ./data:/var/lib/postgresql/data ## uncomment if you want to have Postgres (TSDB) port opened on host # ports: # - '5432:5432' xormon: image: xorux/xormon-ng:latest restart: unless-stopped depends_on: - timescaledb env_file: .env volumes: - ./files:/usr/src/app/server-nest/files ports: - ${APP_PORT}:${APP_PORT} - 8162:8162 - Run containers
docker compose up -d
- Navigate to XorMon NG GUI
https://<docekr_vm_IP>:8443/
Default login: xormon / xormon
- XorMon NG upgrade
Do not use 'Application Upgrade' form in GUI!
docker compose pull
docker compose up -d
Docker run method
- Prerequisites
- Linux VM with the latest version of Docker Engine
- access to Docker Hub
- available ports: 5432 and 8443
- Create a directories for permanent data storage
mkdir -p /var/xormon-ng/data
mkdir -p /var/xormon-ng/files
- Timescale DB
- Prepare a password for the databse and note it down
- Run thedatabase container
docker run -v /var/xormon-ng/data:/var/lib/postgresql/data \
-d --name timescaledb -p 5432:5432 \
-e POSTGRES_PASSWORD=<db_password> timescale/timescaledb:latest-pg16
- Prepare a password for the databse and note it down
- XorMon NG
- Prepare a configuration file
cd /var/xormon-ng
vi ./xormon-ng.env
file contents (copy/paste)APP_PORT=8443 APP_TIMEZONE=<timezone> DB_HOST=timescaledb DB_PORT=5432 DB_USERNAME=postgres DB_PASSWORD=<db_password> DB_DATABASE=xormon APP_SECRET=<xormon-secret>
Replace <variables> with values:- <timezone> : Linux timezone, e.g. 'Europe/Prague' (see TZ in /usr/share/zoneinfo)
- <db_password> : password used for running Timescale DB container
- <xormon-secret> : any unique string, e.g. 'my-xormon-secret'
- Run XorMon NG container
docker run -d --name xormon -p 8443:8443 \
-v /var/xormon-ng/files:/usr/src/app/server-nest/files \
--link timescaledb:timescaledb --env-file ./xormon-ng.env xorux/xormon-ng:latest
- Prepare a configuration file
- Navigate to XorMon NG GUI
https://<docekr_vm_IP>:8443/
Default login: xormon / xormon
- XorMon NG upgrade
Do not use 'Application Upgrade' form in GUI!
Stop, remove and re-run XorMon NG container
docker rm -f {UUID|name}
docker run -d --name xormon -p 8443:8443 \
-v /var/xormon-ng/files:/usr/src/app/server-nest/files \
--link timescaledb:timescaledb --env-file ./xormon-ng.env xorux/xormon-ng:latest
3) Manual installation on a clean Linux OS
Supported operating systems:- RedHat Linux, Rocky Linux: 8/9 (x86)
- Debian: 11/12, Ubuntu: 22.04
- RedHat Linux, Rocky Linux 9+ (ppc: PowerPC Little Endian)
Sizing, start with this setup (for monitoring up to 5000 VMs and 20 storage devices):
- 6 vCPUs
- 24GB RAM
- 200GB disk space
Note the DB is by default in /var/lib/pgsql/ or /var/lib/postgresql, it could be reallocated, read further
RedHat Linux / Rocky Linux (x86)
- Disable SELinux (as root)
- Edit /etc/selinux/config
- Set SELINUX=disabled
- reboot
- Create xormon user (as root)
adduser xormon
passwd xormon
Increase user system limits
Append following lines to /etc/security/limits.conf
xormon          hard    stack           -1
xormon          soft    stack           -1
xormon          hard    data            -1
xormon          soft    data            -1
xormon          hard    nofile          32768
xormon          soft    nofile          32768
xormon          hard    nproc           64000
xormon          soft    nproc           64000
- Enable PowerTools / CodeReady Builder repository (as root)
# RHEL 8:
subscription-manager repos --enable codeready-builder-for-rhel-8-x86_64-rpms

# RHEL 9:
subscription-manager repos --enable codeready-builder-for-rhel-9-x86_64-rpms

# Rocky Linux 8.x
dnf config-manager --set-enabled powertools

# Rocky Linux 9.x
dnf config-manager --enable crb
- Install additional packages (as root)
dnf install -y epel-release
dnf install -y perl ed libxml2 sharutils epel-release wget curl gnupg net-tools sblim-wbemcli libaio wget curl strace
dnf install -y perl-TimeDate perl-XML-Simple perl-XML-SAX perl-XML-LibXML perl-Env perl-CGI perl-Data-Dumper
dnf install -y perl-LWP-Protocol-https perl-libwww-perl perl-Time-HiRes perl-IO-Tty openldap-clients
dnf install -y perl-JSON perl-JSON-PP perl-JSON-XS net-snmp-perl perl-DBI perl-DBD-ODBC unixODBC unixODBC-devel freetds
dnf install -y python3-virtualenv python3-pip libpq-devel python3-devel
- Install Java 11 (necessary only for Hitachi VSP monitoring, required by Hitachi Export Tool)
dnf install -y java-11-openjdk-headless
- Install Node.js (as root)
Xormon NG should work with Node.js 16+.
We recommend Node.js 20.x or newer.
curl -fsSL https://rpm.nodesource.com/setup_20.x | bash -
dnf install -y nodejs
npm update -g npm
node -v
You can download and install Node.js from RPM if you cannot access the repository directly.
rpm.nodesource.com/pub_20.x/el/8/x86_64/nodejs-20.5.0-1nodesource.x86_64.rpmdnf install ./nodejs-20.5.0-1nodesource.x86_64.rpm -y npm update -g npm node -v
- Install Timescale DB (as root)
Xormon NG requires TimescaleDB 2.13 and newer.
TSDB documentation
TSDB Postgres support
- Disable built-in PostgreSQL module
dnf -qy module disable postgresql
- Install TSDB and PostgeSQL packages
Try it directly, it might be in your local company's standards repos already:dnf install -y timescaledb-2-postgresql-16 postgresql16-contrib
If above fails, you must add PostgreSQL and TimescaleDB repositories and try it again
- Add PostgreSQL repository
dnf install -y https://download.postgresql.org/pub/repos/yum/reporpms/EL-8-x86_64/pgdg-redhat-repo-latest.noarch.rpm
- Add TimescaleDB repository
Execute this as single cmd, copy&paste all lines below on the cmd linetee /etc/yum.repos.d/timescale_timescaledb.repo <<EOL [timescale_timescaledb] name=timescale_timescaledb baseurl=https://packagecloud.io/timescale/timescaledb/el/$(rpm -E %{rhel})/\$basearch repo_gpgcheck=1 gpgcheck=0 enabled=1 gpgkey=https://packagecloud.io/timescale/timescaledb/gpgkey sslverify=1 sslcacert=/etc/pki/tls/certs/ca-bundle.crt metadata_expire=300 EOL
- Add PostgreSQL repository
- Optionaly you might change database location from default /var/lib/postgresql/16/main
Note that database must be on a filesystem having 100GB free at least (in big environments rather 500GB)vi /etc/postgresql/16/main/postgresql.conf data_directory = '/home/xormon/xormon-ng/postgresql'
under xormon user:mkdir /home/xormon/xormon-ng mkdir /home/xormon/xormon-ng/postgresql
- Initialize DB
/usr/pgsql-16/bin/postgresql-16-setup initdb
- Tune DB
timescaledb-tune -yes --pg-config=/usr/pgsql-16/bin/pg_config
- Enable automatic start
systemctl enable --now postgresql-16
- Set password for user postgres
sudo -u postgres psql

postgres=# \password postgres
postgres=# \q
Make note of the password. It will be needed later during XorMon NG installation.
- Disable built-in PostgreSQL module
- Configure firewall (optional, as root)
Open XorMon NG port in the firewall 8443 TCP (XorMon UI) and 8162 TCP (OS agent communication).
firewall-cmd --zone=public --add-port=8443/tcp --permanent
firewall-cmd --zone=public --add-port=8162/tcp --permanent
firewall-cmd --reload
Debian / Ubuntu Linux
- Create xormon user (as root)
adduser xormon
Increase user system limits, append this into /etc/security/limits.conf file
xormon          hard    stack           -1
xormon          soft    stack           -1
xormon          hard    data            -1
xormon          soft    data            -1
xormon          hard    nofile          32768
xormon          soft    nofile          32768
xormon          hard    nproc           64000
xormon          soft    nproc           64000
- Add 'non-free' repository to apt sources
vi /etc/apt/sources.list
Your '/etc/apt/sources.list' should look like:# Debian 11 deb http://deb.debian.org/debian/ bullseye main contrib non-free deb-src http://deb.debian.org/debian/ bullseye main contrib non-free deb http://security.debian.org/debian-security bullseye-security main contrib non-free deb-src http://security.debian.org/debian-security bullseye-security main contrib non-free deb http://deb.debian.org/debian/ bullseye-updates main contrib non-free deb-src http://deb.debian.org/debian/ bullseye-updates main contrib non-free # Debian 12 deb http://deb.debian.org/debian/ bookworm main non-free-firmware non-free deb-src http://deb.debian.org/debian/ bookworm main non-free-firmware non-free deb http://security.debian.org/debian-security bookworm-security main non-free-firmware non-free deb-src http://security.debian.org/debian-security bookworm-security main non-free-firmware non-free deb http://deb.debian.org/debian/ bookworm-updates main non-free-firmware non-free deb-src http://deb.debian.org/debian/ bookworm-updates main non-free-firmware non-free
- Install additional packages (as root)
apt update
apt install -y perl ed wget ca-certificates curl gnupg sudo snmp snmp-mibs-downloader nmap alien libaio1 ksh tcpdump sblim-wbemcli net-tools strace
apt install -y librrdp-perl libxml-sax-perl libxml-simple-perl libtimedate-perl libenv-sanctify-perl libcgi-pm-perl
apt install -y libsnmp-perl libdata-dumper-simple-perl libxml2-utils liblwp-protocol-https-perl libcrypt-ssleay-perl ldap-utils
apt install -y libio-socket-ssl-perl libmozilla-ldap-perl libxml-parser-perl libjson-xs-perl libio-pty-perl libxml-libxml-perl
apt install -y postgresql-common apt-transport-https lsb-release libdbd-odbc-perl default-jre libdbd-pg-perl python3-venv
- Installation Java 11 (necessary only for Hitachi VSP monitoring, required by Hitachi Export Tool)
- Install Node.js (as root)
Xormon NG should work with Node.js 16+.
We recommend Node.js 20.x or newer.
curl -fsSL https://deb.nodesource.com/setup_20.x | bash -
apt-get install -y nodejs
npm update -g npm
node -v
- Install Timescale DB (as root)
Xormon NG requires TimescaleDB 2.13 and newer.
TSDB documentation
TSDB Postgres support
- Run the PostgreSQL repository setup script
/usr/share/postgresql-common/pgdg/apt.postgresql.org.sh
- Configure TSDB repository
# Debian:
echo "deb https://packagecloud.io/timescale/timescaledb/debian/ $(lsb_release -c -s) main" | tee /etc/apt/sources.list.d/timescaledb.list

# Ubuntu:
echo "deb https://packagecloud.io/timescale/timescaledb/ubuntu/ $(lsb_release -c -s) main" | tee /etc/apt/sources.list.d/timescaledb.list
- Install TimescaleDB
wget --quiet -O - https://packagecloud.io/timescale/timescaledb/gpgkey | apt-key add -
apt update
apt install -y timescaledb-2-postgresql-16 postgresql-client
systemctl enable --now postgresql
- Optionaly you might change database location from default /etc/systemd/system/multi-user.target.wants/postgresql.service
Note that database must be on a filesystem having 100GB free at least (in big environments rather 500GB)vi /etc/systemd/system/multi-user.target.wants/postgresql.service data_directory = '/home/xormon/xormon-ng/postgresql'
under xormon user:mkdir /home/xormon/xormon-ng mkdir /home/xormon/xormon-ng/postgresql
- Tune DB
timescaledb-tune -yes
systemctl restart postgresql
- Set password for user postgres
sudo -u postgres psql

postgres=# \password postgres
postgres=# \q
Make note of the password. It will be needed later during XorMon NG installation.
- Run the PostgreSQL repository setup script
- Configure firewall (optional, as root)
Open XorMon NG port in the firewall 8443 TCP (XorMon UI) and 8162 TCP (OS agent communication).
Install UFW firewall if neededapt install -y ufw ufw enable
Configure firewallufw allow ssh ufw allow http ufw allow https ufw allow 8443/tcp ufw allow 8162/tcp ufw reload
RedHat Linux / Rocky Linux (ppc: PowerPC Little Endian)
-
Disable SELinux (as root)
- Edit /etc/selinux/config
- Set SELINUX=disabled
- reboot
-
Create xormon user (as root)
adduser xormon
passwd xormon
Increase user system limits
Append following lines to /etc/security/limits.conf
xormon          hard    stack           -1
xormon          soft    stack           -1
xormon          hard    data            -1
xormon          soft    data            -1
xormon          hard    nofile          32768
xormon          soft    nofile          32768
xormon          hard    nproc           64000
xormon          soft    nproc           64000
-
Enable PowerTools / CodeReady Builder repository (as root)
# RHEL 9:
subscription-manager repos --enable codeready-builder-for-rhel-9-x86_64-rpms

# Rocky / Alma / Centos Linux 9.x
crb enable
-
Install additional packages (as root)
dnf install -y epel-release
dnf install -y perl ed libxml2 sharutils epel-release wget curl gnupg net-tools sblim-wbemcli libaio wget curl strace
dnf install -y perl-TimeDate perl-XML-Simple perl-XML-SAX perl-XML-LibXML perl-Env perl-CGI perl-Data-Dumper
dnf install -y perl-LWP-Protocol-https perl-libwww-perl perl-Time-HiRes perl-IO-Tty openldap-clients
dnf install -y perl-JSON perl-JSON-PP perl-JSON-XS net-snmp-perl perl-DBI perl-DBD-ODBC unixODBC unixODBC-devel freetds
dnf install -y python3-virtualenv python3-pip libpq-devel python3-devel
- Install Java 11 (necessary only for Hitachi VSP monitoring, required by Hitachi Export Tool)
dnf install -y java-11-openjdk-headless
-
Install Node.js (as root)
Xormon NG should work with Node.js 16+.
We recommend Node.js 20.x or newer.
There are no RPMs available for ppc64le, get Power LE binaries from here: nodejs.org/en/download/prebuilt-binaries, i.e. LTS 20.12.0:
cd /tmp
wget https://nodejs.org/dist/v20.12.0/node-v20.12.0-linux-ppc64le.tar.xz
# extract package to /usr/local
cd /usr/local
tar xf /tmp/node-v20.12.0-linux-ppc64le.tar.xz --strip-components=1
# check node version
node --version
# remove source file
rm /tmp/node-v20.12.0-linux-ppc64le.tar.xz

# allow node binary to use privilleged (< 1024) ports, so we can run Xormon on a standard HTTPS port (443)
setcap 'cap_net_bind_service=+ep' /usr/local/bin/node
-
Install Timescale DB (as root)
Xormon NG requires TimescaleDB 2.13 and newer.
TSDB documentation
TSDB Postgres support
- Enable PostgreSQL module to allow PostgreSQL 15
dnf -qy module enable postgresql
- Install PostgeSQL packages
dnf install -y postgresql-server postgresql-contrib
- Optionaly you might change database location from default /var/lib/pgsql/data
Note that database must be on a filesystem having 100GB free at least (in big environments rather 500GB)
postgresql-setup --help
- Initialize DB
postgresql-setup initdb
- Change PostgreSQL Client Authentication Configuration
# replace all ident methods with scram-sha-256 to anable login via TCP
sed -i 's/ident$/scram-sha-256/g' /var/lib/pgsql/data/pg_hba.conf
- Timescale DB
As there are no RPMs for PowerPC architecture, we must compile from sources
# essentials for building
dnf install cmake gcc postgresql-server-devel
Get the latest release (tar.gz source codes) from github.com/timescale/timescaledb/releases and extract to /tmp/timescaledb-2.xx.xcd /tmp wget https://github.com/timescale/timescaledb/archive/refs/tags/2.14.2.tar.gz -O - | tar xz # bootstrap the build system cd timescaledb-2.14.2/ ./bootstrap # to build the extension cd build && make # to install make install
We need timescaledb-tune to configure PGSQL, install with Go lang if you are onlinednf install golang go install github.com/timescale/timescaledb-tune/cmd/timescaledb-tune@latest # tune PGSQL for TSDB /root/go/timescaledb-tune -yes -pg-config /usr/bin/pg_config -conf-path /var/lib/pgsql/data/
or get ready to use RPM to install timescaledb-tune:dnf install timescaledb-tune.el9.ppc64le.rpm # tune PGSQL for TSDB timescaledb-tune -yes -pg-config /usr/bin/pg_config -conf-path /var/lib/pgsql/data/
- Enable and run PostgreSQL service
systemctl enable --now postgresql
- Set password for user postgres
sudo -u postgres psql

postgres=# \password postgres
postgres=# \q
Make note of the password. It will be needed later during XorMon NG installation.
- Enable PostgreSQL module to allow PostgreSQL 15
-
Configure firewall (optional, as root)
Open XorMon NG ports in the firewall: HTTPS (443) (XorMon UI) and 8162 TCP (OS agent communication)
# OS agents connect to the port 8162
firewall-cmd --zone=public --add-port=8162/tcp --permanent
# UI runs on port 443
firewall-cmd --zone=public --add-service=https --permanent
# apply rules
firewall-cmd --reload
XorMon NG Installation
- Log in as 'xormon' and create installation directory
su - xormon
mkdir xormon-ng
cd xormon-ng
- Download latest XorMon NG package to /home/xormon/xormon-ng
tar zxf xormon-ng-<ver>.tar.gz
rm xormon-ng-<ver>.tar.gz
./xormon.sh start
- Provide database password created during OS configuration when you are prompted
DB_HOST[127.0.0.1]=
DB_PORT[5432]=
DB_USERNAME[postgres]=
DB_DATABASE[xormon]=
DB_PASSWORD[]= <password>
- Optionaly you might change application default listening port 8443
It could be changed to whatever else, even to 443 (https) if there is nothing listening on your server
Check that port 443 is free, it should not provide any output, if so, then 443 uses other application and you must stay on 8443netstat -an| grep LISTEN |grep ":443 "
to change to 443 run this under root (note this must be re-run after each Node.js upgrade):setcap 'cap_net_bind_service=+ep' `which node`
Change port in the application under xormon user and restart Xormon NGvi ~/xormon-ng/server-nest/.env APP_PORT=443 cd /home/xormon/xormon-ng ./xormon.sh stop ./xormon.sh start
Configure Python3 virtual environment
-
Log in as 'xormon' and create Python3 virtual environment
cd ~/xormon-ng/server-nest/
python3 -m venv venv
venv/bin/python3 -m ensurepip --upgrade
venv/bin/python3 -m pip install --upgrade pip
venv/bin/python3 -m pip install -r microservices/analyzer/requirements/requirements.txt

cd ~/xormon-ng
./xormon.sh start
Setup XorMon NG startup script (as root)
systemd based (RedHat 8+, Debian 10+ )env PATH=$PATH:/usr/bin /home/xormon/xormon-ng/server-nest/node_modules/pm2/bin/pm2 startup systemd -u xormon --hp /home/xormon
Navigate to XorMon NG GUI
https://<IP>:8443/Default login: xormon / xormon
Upgrade
Use one of these methods- Upgrade from XorMon NG UI
- Upgrade from CLI
- Docker upgrade
Download the latest xormon-ng-<ver>.tar.gz to your workstation
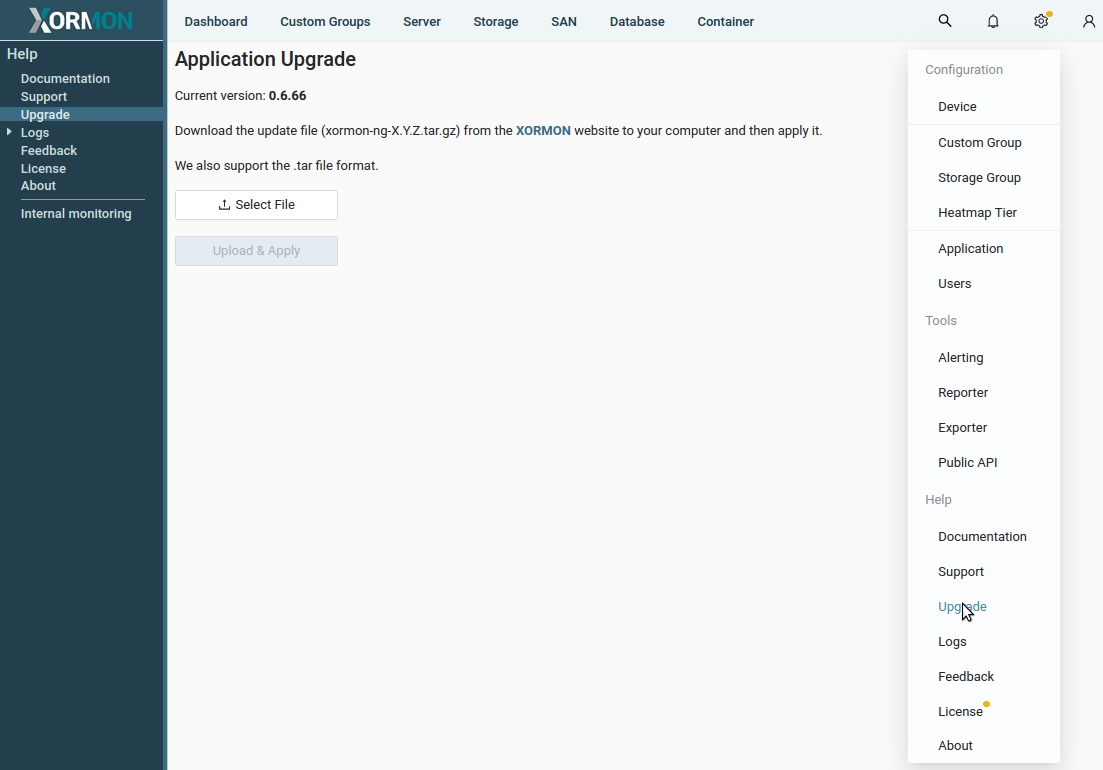
- Upgrade from XorMon NG UI
- Go to Settings icon on the top-right
- Select 'Upgrade'
- Click 'Select File' and provie path to xormon-ng-<ver>.tar.gz
- Click 'Upload & Apply' and wait for 'Upgrade Successful' message
- Wait two or three minutes, refresh your browser and login
- Upgrade from CLI
- Log in as user xormon
- Download XorMon NG TAR file "xormon-ng-X.Y.Z.tar.gz" to /tmp
- Upgrade
cd /home/xormon/xormon-ng/
./xormon.sh upgrade /tmp/xormon-ng-X.Y.Z.tar.gz
- Log in as user xormon
- Docker upgrade
Do not use 'Application Upgrade' form in GUI!
Use XorMon NG Docker package
- Docker-compose method
docker-compose pull
docker-compose up -d
- Docker run method from the local image
Load, stop, remove and re-run XorMon NG container
- Upgrade to the latest version:
docker load < xormon-ng-docker-<version>.tar.gz docker rm -f {UUID|name} docker run -d --name xormon -p 8443:8443 \ -v /var/xormon-ng/files:/usr/src/app/server-nest/files \ --link timescaledb:timescaledb --env-file ./xormon-ng.env xorux/xormon-ng:latest - If you wish to use other version or install the image manually, use docker load
docker load < xormon-ng-docker-<version>.tar.gz
docker rm -f {UUID|name}
docker run -d --name xormon -p 8443:8443 \
-v /var/xormon-ng/files:/usr/src/app/server-nest/files \
--link timescaledb:timescaledb --env-file ./xormon-ng.env <image>
<image> ... version of your loaded image
- Upgrade to the latest version:
- Docker-compose method
Supported technologies
The latest beta release of XorMon NG support monitoring of following technologies and featuresDevice installation manuals are very similar to LPAR2RRD and STOR2RRD installation manuals.
Just skip port open checking from cmd line and crontab changes.
Follows links below for installation details
Server
Database
Clouds
Container
Network
Storage
- Cohesity DataProtect
- Dell EMC² PowerFlex (ScaleIO)
- Dell EMC² PowerScale (Isilon)
- Dell EMC² PowerStore
- Dell EMC² DataDomain 6.x+
- Dell EMC² ECS
- Dell EMC² Compellent, SC series
- Dell EMC² MD3000
- Dell EMC² ME4/5
- Dell EMC² PowerMAX , VMAX
- DotHill AssuredSAN
- Hitachi Data Systems VSP E/F/G/N/5000
- HPE Alletra 9000
- HPE Primera
- HPE 3PAR
- HPE Storeonce V4
- HPE MSA
- HPE Nimble
- HPE XP7/8
- Huawei Dorado
- Huawei OceanStore
- Huawei OceanProtect Backup Storage
- IBM FlashSystem, Storwize, SVC, Spectrum Virtualize
- IBM DS3xxx, 4xxx, 5xxx
- IBM Cloud Object Storage
- IBM XIV
- IBM A9000
- Infinidat Infinibox
- Inspur AS5600/5500/2600/2200
- Lenovo DE Series
- Lenovo DM Series
- Lenovo V Series
- Lenovo S Series
- NetApp AFF A-series
- NetApp E/EF-series
- NetApp FAS (Clustered Data OnTAP (CDOT))
- NetApp StorageGRID
- Oracle ZFS
- Pure Storage FlashArray
- QNAP NAS
- Quantum StorNext
- Rubrik CDM
- Seagate Exos X
Not supported features yet
- IBM Power Systems: CPU Workload Estimator
- IBM Power Systems: Resource configuration Advisor
- IBM Power Systems: NMON support
- VMware: Resource configuration Advisor
- OS agent: IBM i